Cardboard Airplane
August 5, 2013 in Creations by Anna
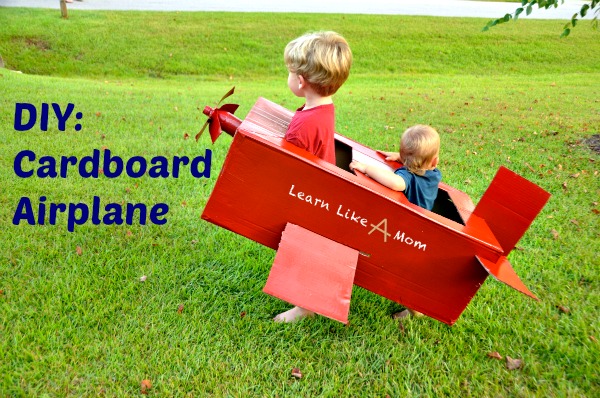
I decided to make the boys their own cardboard airplane to play with around the house and yard. Both boys will drop everything when they hear a plane or helicopter in the sky and anyone within earshot will hear them screeching in excitement as they point it out. So, I knew this would be a hit.
How To Make A Cardboard Airplane
Materials
You’ll want the following (or something similar):
one empty large box (I used a car seat box)
one empty rectangular tissue box
duct tape
a pen
a marker
sturdy scissors
a box cutter
one empty 16.9oz plastic bottle
one pool noodle
spray paint
Steps
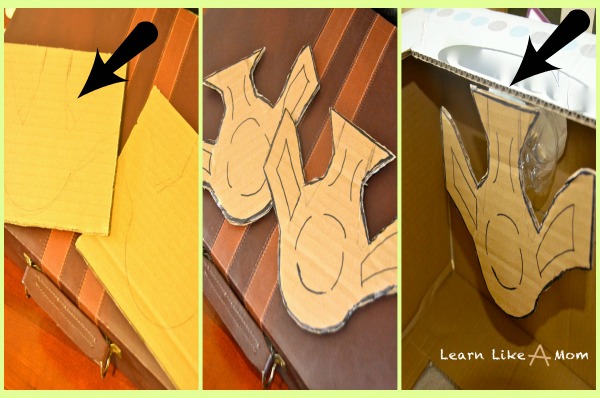
1. Make sure you have an empty, sturdy box. One end should be closed. The other should be open. Cut the short flaps off the open end and keep those rectangles for the tail end of the airplane.

2. Cut two rectangles out of the top. I made one larger than the other because I had Big Brother and Little Brother in mind. I just eyeballed this, but if you must measure and write, please feel free…it’s your project! KEEP the rectangles, because you will need them!

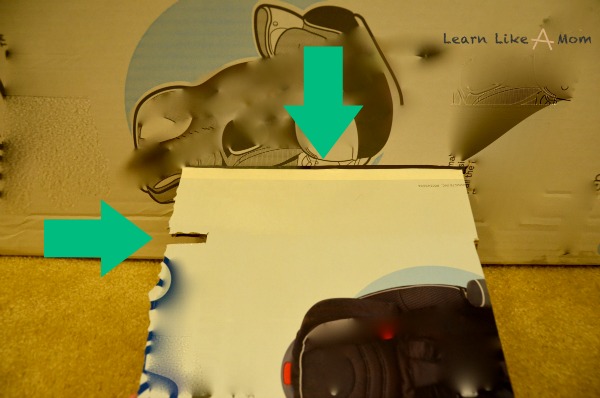
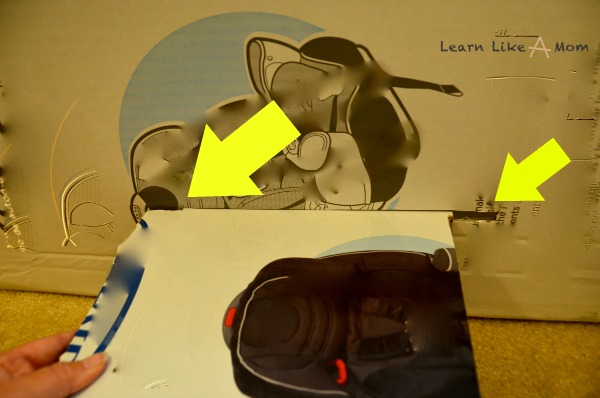
3. On the side of the box that is still sealed, use the box cutter blade to cut out three L-shaped slots, about the width of the cardboard itself. One is for the vertical stabilizer and two for the horizontal stabilizers. Take one of the rectangles from Step 2 (I used the smaller of the two) and use it as a guide for the vertical stabilizer. Use the two short flaps that you cut off in Step 1 as a guide for the horizontal stabilizer slots.

4. Flip the box over and cut out two more rectangles on what will be the bottom of the airplane. (You should see your floor when you look through the holes.)

5. Flip the box back over so the bottom is on the floor. On the long side of the box, decide where you will want the wings. The wings are one of the rectangles from Step 2 and the matching rectangle from Step 4. (I used the larger rectangles for this.) BEFORE you cut, place the wing next to the box and mark the length of the slot. Cut the slot the width of the cardboard. About 2.5 inches from the end of the wing that will be inserted into the body of the airplane, cut a little slot off the side, about an inch long. Again, this should be about the width of the cardboard you’re using.
6. Repeat Step 5 for the other side of the airplane, using the wing that will be placed on that side. When you slide the wing into the side of the box, you will be able to slide it over, so the wing will stay in place, as seen below.
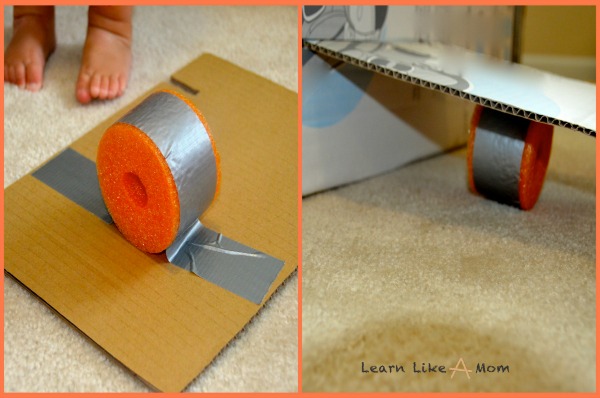
7. Look around your house for something to use for the wheels. I found pool noodles and it really won’t matter if they are five inches shorter. So. I cut about 2.5 inches off the pool noodle for one wheel and did it again for the second wheel.

8. Flip a wing over. Use duct tape to tape your wheel to the bottom of the wing. I checked the placement while the wing was in place first, so I knew once it was taped to the bottom of the wing, it would prop it up a little bit.
9. Repeat Step 8 for the opposite wing.
10. Make two controls out of one of the pieces of remaining cardboard. Sketch the controls, leaving an extra piece at the top (to attach it to the box). Using the sturdy scissors, cut out the controls and then dress them up a bit with a marker. (I didn’t get too fancy with this entire project because I’m pretty sure it’ll be destroyed through use quickly.) Use duct tape to tape the controls into the sitting area. (Look at the picture in Step 15 if you want to see what they will look like once they are taped in.)
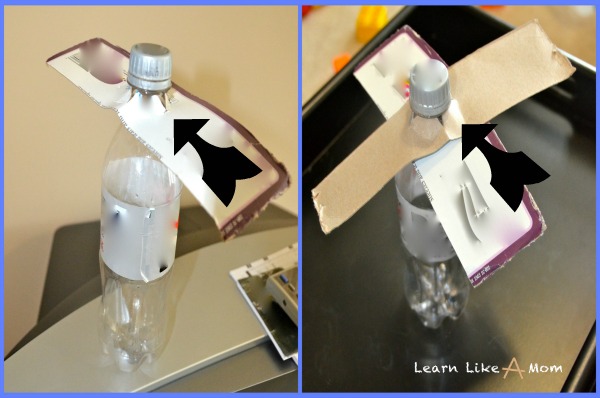
11. Cut the bottom off a rectangular tissue box. Cut it in half, lengthwise. Locate the middle and score it with a pen. TRACE the X with the box cutter. Using the scissors, cut out a circle at the center of the X, but DON’T cut all the way out to the tips of the X. Do you see the marks that remain around the circle?

12. Gently slide the holes over the top of the plastic container. There should be some resistance and it should be a tight fit in the end.
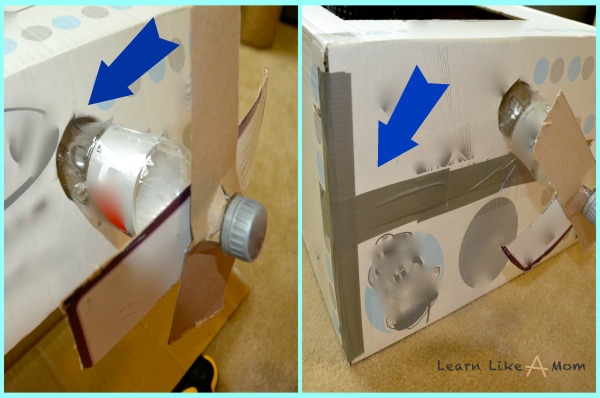
13. Take the bottle to the open side of the large box (which will become the front of the airplane.) Trace the bottom of the bottle on the top flap. Use the box cutter to cut around INSIDE that circle. You don’t want the circle to be too big for the bottle!

14. Gently push the bottom of the bottle into the hole. Again, there should be some resistance, but the bottle shouldn’t fall all the way through. Then duct tape the remaining flaps back together and the sides shut.
15. The body of the airplane is complete! Put all the pieces together just to be sure!

16. In a well-ventilated area, choose a color of your choice and spray paint the pieces of the airplane. Follow the directions on the paint you choose, allowing it to dry. When it dries, you can flip everything over and continue painting. (We chose red because I had leftover red spray paint from a previous project.) Also, feel free to add extra designs!

17. Assemble the pieces. Call the kids to play!

18. Play with the airplane in a seated position!

19. Play with the airplane in a standing position!
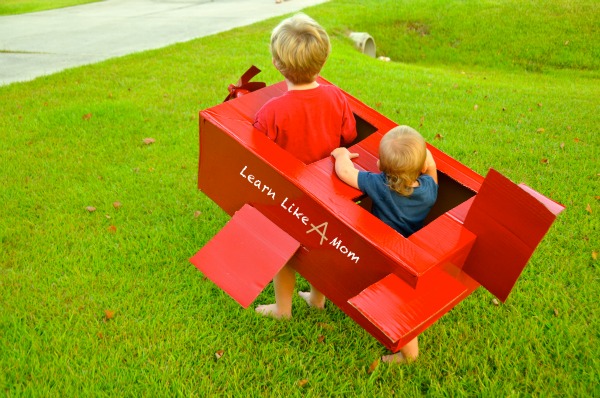
Since Disney’s PLANES have character, I thought we’d name our new character Redeye. What do you think?
If you’re excited about PLANES in your house too, check out the official Disney PLANES site. I also found Better in Bulk that has more information about the movie and free downloads for kids to color!
I hope this DIY airplane project will bring some high flying joy to your family! Let me know how it goes or if you come across any tips to make it easier!


Anna–this is AWESOME!!! Love it! Be sure to link it up to the Let’s Hear it for the Boy party this week! 🙂
As you now know, I did! I hope it worked correctly. 🙂
[…] For The Boy Thursday is a linky party that four other bloggers host. (I linked up this week with my DIY Cardboard Airplane Post.) I enjoy this because…obviously with boys…I’m always open to new and exciting […]
This is SO great! I love those sweet little toes peeking into the photo in Step #9 🙂
I know! The kids were by me every step of the process, except the spray painting. Our dog too. It was exciting for them, but did make the work a little more difficult to document.
Great tutorial. We’ll add a link on our site.
You can add to the fun with a cardboard airplane sticker set from http://paperboxpilots.com
Realistic dials and gauges make it just “PLANE” fun!
Brian Cahoon recently posted…How to make a cardboard airplane – tutorial
Thanks for letting me know, Brian! I just checked out your site and those stickers do look like they’d add a bit more to the pretending! I appreciate your link!
Anna recently posted…Duct Tape Pirate Eye Patch and Sword
[…] http://learnlikeamom.com/creative-corner/diy/cardboard-airplane/ […]
It’s hard to find knowledgeable people in this particular topic, but
you seem like you know what you’re talking about!
Thanks
stern recently posted…stern
It’s enormous that you are getting ideas from this paragraph as well as from our argument made at this
time.
showbox for pc recently posted…showbox for pc
Thanks for any other fantastic post. Where else may
just anyone get that type of information in such an ideal means of writing?
I have a presentation next week, and I’m on the swarch for such
information.
Contoh Undangan Pernikahan recently posted…Contoh Undangan Pernikahan
it seems like a fun activity I will try to create a cardboard aeroplane with the help of your tip step by step, thanks for sharing it.
look at more info https://cool-mining.com/en/mining-en/nbminer-v30-2-nebutech-download-amd-nvidia-cuda-miner/